Step1: How to call SDK?
|
Notes:
|
|
Example: Client_id - 42Zuw71Ok7e2TGAgHPKttM7PFGMspJLLy3ewq15dhgjtGM9l |
For MOREFUN users, the device type should be
| dataModel.setDevice_name = “morefun” |
For PAX users, the device type should be
| dataModel.setDevice_name = "pax" |
For WISEASY users, the device type should be
| dataModel.setDevice_name = "Wiseasy |
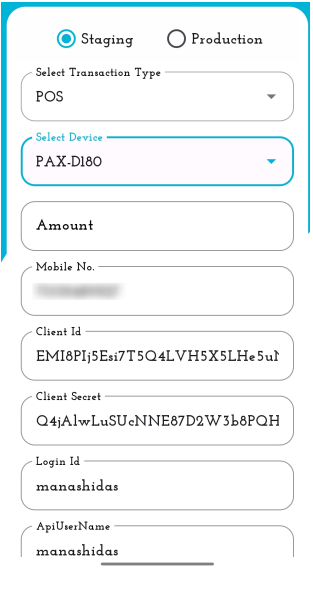
Sample App View
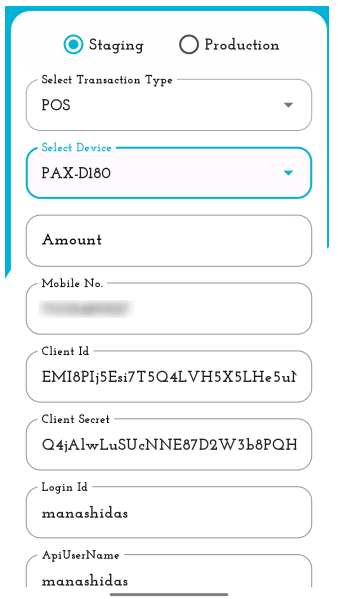
- Select POS as the type of transaction.
- Select the appropriate Device needed for the transaction.
- Fill in the details correctly.
- Select Skip Receipt if you want to bypass the Receipt generation step.
- Finally, click on POS button to proceed.
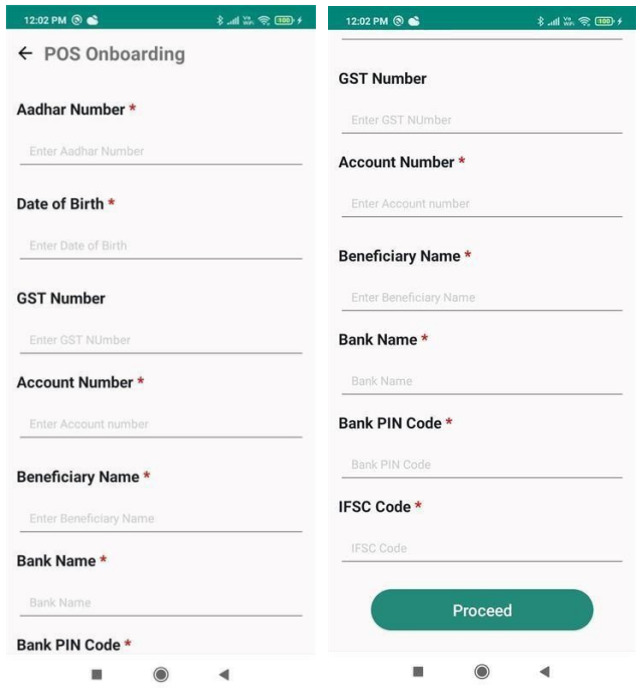
To be able to perform a POS transaction, the merchant must be Onboarded.
- On the POS Onboarding page fill in all the necessary details (mandatory fields are marked with an * ).
- Click on Proceed to go forward with the Onboarding process.
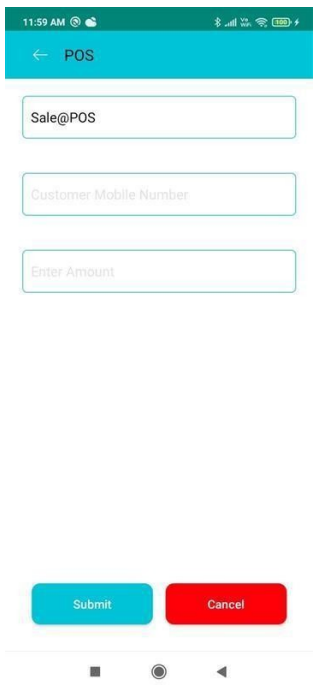
- Initiate POS transaction.
- Sale@POS is initiated.
- Fill in the Customer Mobile Number and enter the Amount of the transaction.
- Click on Submit to proceed with the transaction or click Cancel to abort
|
NOTE:
|
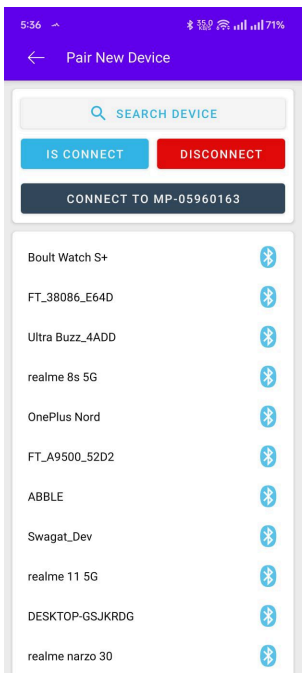
For PAX Devices:
- The available devices will be displayed that can be connected via Bluetooth.
- The Device IDs are displayed (as highlighted inthe image) and clicking on it will get them
connected and ready for transaction.
For MoreFun Devices:
- Search for the device.
- Click on IS CONNECT or DISCONNECT accordingly to connect or abort the connection respectively.
- Device Connected shows the device that is connected and can be used for performing the transaction.
Step2: Required Parameters to be sent to the SDK
| Name | Parameter Name | Description | Valid Values (Type) and Validation | Mandatory /Optional |
| Transaction Amount | transactionAmount | Transaction amount for cash withdrawal | Numeric. A minimum of 100 and a maximum of 10000. | Mandatory |
| Transaction Type | transactionType | Type of transaction to be performed. | String | Mandatory |
| Shop Name | shop_name | To be used as per client requirement. | Alphanumeric String | Optional |
| Brand Name | brand_name | To be used as per client requirement. | Alphanumeric String | Optional |
| Application Type | applicationType | Application Category | String | Mandatory |
| Param B | paramB | To be used by the client as per requirement | Alphanumeric String. Maximum length is 20. | Optional |
| Param C | paramC | To be used by the client as per requirement | Alphanumeric String. Maximum length is 20. | Not Mandatory |
| Device Type | device_type | Terminal brand name | String | Mandatory |
| Device Name | device_name | Terminal Model Number | String | Optional |
| API User Name | apiUserName | API User's name | String | Mandatory |
| Client Reference ID | ClientRefID | Reference ID of the Client. | Alphanumeric String. Maximum length is 18. | Mandatory |
| HeaderSecrets | headerSecrets | Will be generated by using client id and client secret provided by iServeU | Alphanumeric String | Mandatory |
| PassKey | passKey | Will be shared by iServeU | Alphanumeric String | Mandatory |
| Login ID | loginID | User application login ID or username | Alphanumeric String | Mandatory |
| Skip Receipt | skipReceipt | If client wants to skip the receipt downloading part. | Boolean. Default value is false. Set true to skip receipt download. |
Mandatory |
Data Model Java Class
Step3: Sample Code for passing the data through the data model.
Sample App View - POS:
|
NOTE: For POS the Amount (Should be greater than equal to 100 and less than equal to 10000 ) and the Mobile Number have to be filled in to proceed with the transaction. |
Please refer to the code sample below:
Step4: Override method to get the transaction data
User can check the Status & ClientRefID value using this Callback Method.
Implements POSOnFinishListener in the Activity where this below method will override.
Required Keys to get the transaction data from the Callback
| Name | Description | Key name |
| flag | Status of the Transaction. E.g. - SUCCESS/FAILED | FLAG |
| Transaction Type | Type of transaction performed. Here it is “Sale@POS”. | TRANSACTION_TYPE |
| Transaction ID | Transaction ID | TRANSACTION_ID |
| Rrn no | 12 digit RRN Number | RRN_NO |
| Response code | To be used by the client as per requirement | RESPONSE_CODE |
| Amount | Amount being transacted. | AMOUNT |
| MID | Merchant Identification Number | MID |
| TID | Terminal Identification Number | TID |
| Txn ID | Transaction ID | TXN_ID |
| Invoice | Invoice number for the transaction | INVOICE |
| Card type | Type of card used in transaction | CARD_TYPE |
| Appr code | Approval Code | APPR_CODE |
| Card number | Card Number used in the Transaction | CARD_NUMBER |
| Card holder name | Card holder name | CARD_HOLDERNAME |
| Shop Name | Name of the Shop | SHOP_NAME |
| Brand Name | Name of the Brand | BRAND_NAME |
| Status Code | Satus of the transaction. E.g. - 0 for SUCCESS and 1 for FAILED. | STATUS_CODE |
| Status Description | Description of the Status Code. E.g. - TRANSACTION SUCCESSFUL/ TRANSACTION FAILED | STATUS_DESC |

